
In one of our previous articles, we looked at some of the best sphygmomanometers we gave you some buying guides as well. Today we are looking at how to use sphygmomanometer since we feel that not everyone knows how to use the device properly.
Whether you are looking forward to buying a sphygmomanometer or you have already purchased one but don’t know how to use it properly, this guide is all you need to be able to use your blood pressure apparatus properly and efficiently.
I don’t want to believe that everyone reading this article knows what a sphygmomanometer is. So below you will find a brief definition of a sphygmomanometer, types of sphygmomanometer and the various parts of sphygmomanometer. This is for the benefit of those who don’t know what a sphygmomanometer is.
So What Is A Sphygmomanometer?
Basically, Sphygmomanometer is an instrument use for blood pressure checking. This device is also sometimes called BP apparatus. A sphygmomanometer has five main parts: the cuff, the manometer, the bladder, the valve and the bulb. Sphygmomanometer parts and functions are briefly explained below.
- The bulb: It is a small ball-like structure that serves as a pump to inflate the bladder
- The bladder: It is a small soft inflatable rectangular rubber bag enclosed in the cuff. When the bulb is compressed, the bladder gets inflated and occludes the arteries in the arm. The size of the bladder varies
- The Cuff: The cuff holds the bladder around the arm. The bigger the size of bladder, the bigger the size of the cuff
- The Manometer/ Gauge: This is a clock-like device with a screen used to read air pressure in the bladder when inflated by the pumping of the bulb. The reading is recorded in millimetres of mercury (mmHg)
- The Valve: It is used to deflate the cuff
Types of sphygmomanometer
There are 3 types of sphygmomanometer, namely mercury sphygmomanometer, digital sphygmomanometer and aneroid sphygmomanometer. The mercury sphygmomanometer is no longer used in many countries; this is probably because of the harmful chemical, mercury, it uses. Now, let’s have a short overview of the three types.
1. Mercury sphygmomanometer
It is the oldest type of sphygmomanometer for checking blood pressure. It contains mercury and it comes with blood pressure cuff and stethoscope. It’s regarded as the set standard for the other Sphygmomanometers. It is designed with a cuff that is manually inflated. It’s advisable to keep it on a flat surface and at the same level with the arm from which the reading will be taken. Due to the poisonous mercury in it, many countries stop using it.
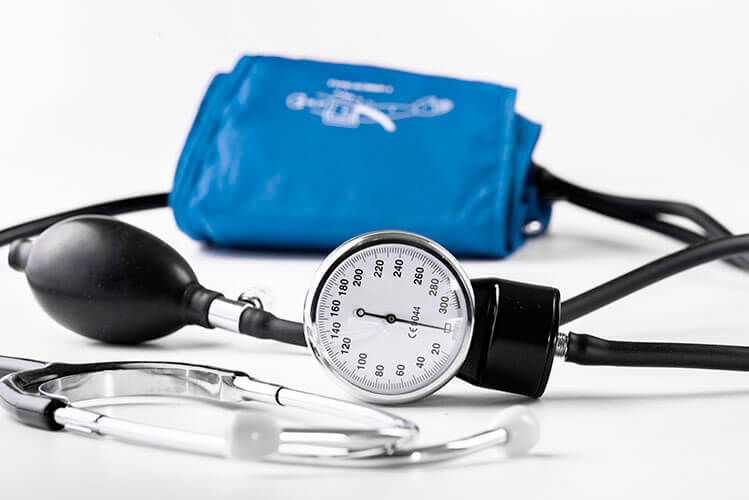
2. Aneroid sphygmomanometer
Aneroid sphygmomanometer come with a stethoscope, a cuff and a dial gauge with a tube. The stethoscope has to be attached to the cuff. The cuff is then attached to a dial gauge with a tube to transfer the pressure in the cuff to the pressure gauge.
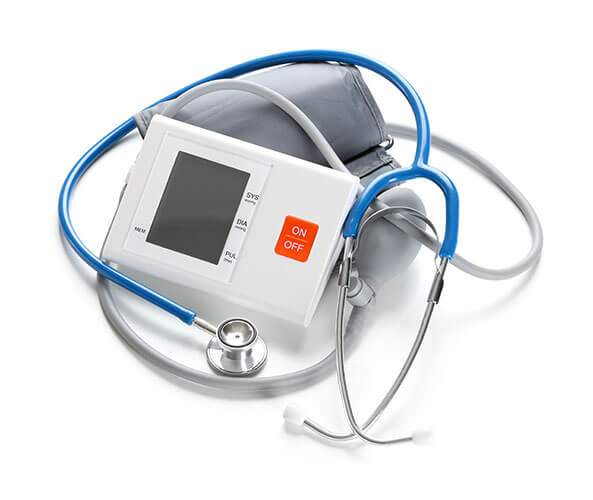
3. Digital sphygmomanometer
This is an advance version of a sphygmomanometer. It comprises an electronic sensor, a sensor for measuring and displaying the readings on a screen.
Now that we have some basic knowledge of the sphygmomanometer, it’s time to look at the main topic of the day, which is how to use a sphygmomanometer.
Click Here To See The Top 10 Sphygmomanometer Recommended By Our Health Expert
How to use a sphygmomanometer
Below is a step by step guide to follow to measure your blood pressure accurately using either a manual sphygmomanometer or a digital blood pressure monitor.
– Sit and relax
The first thing to do is to sit and relax for about 3 minutes, especially if you have taken a walk or engaged in any physical activity prior to checking your blood pressure.
– Pulse Location
Support your arm on a flat surface. Using your index and middle fingers, try locating the brachial artery within the inner centre of your bend elbow. This is to help you palpate or locate your brachial pulse. Once you are able to feel the pulsation, move to step three below.
– Positioning The Cuff
The blood pressure cuff is applied over the forearm above the elbow. Fold the cuff around the arm about 1inch above the elbow ensuring that you don’t cover the location of the pulse you palpated earlier because that is where you will place your stethoscope when using a manual sphygmomanometer. With the help of the adhesive material on the cuff, fasten the cuff around the arm. Avoid fasten the cuff too tight or too loose.
– Inflation And Deflation Of The Cuff
When you are using Manual Sphygmomanometer or Manual BP Monitor:
- Put the earpiece of the stethoscope in the ear and place the diaphragm of the stethoscope at where you palpated the brachial pulse in step 2 above, ensuring that you can hear the pulsation in your ear.
- Have the pressure gauge inside the palm of your left hand and the bulb in the right hand.
- Make sure you close the valve by turning the screw towards yourself or clockwise.
- Compress and release the bulb to inflate the cuff till you are not able to hear the pulsation of the brachial pulse in your ear through the stethoscope.
- Keep your eyes on the gauge and release the cuff pressure gently and slowly by turning the valve screw away from yourself or anticlockwise.
- Pay close attention and listen very carefully for the first pulsation in your ear. Once you hear it, it is your systolic blood pressure, so note the reading on the gauge.
- Keep on deflating gently and slowly whiles watching the gauge till you hear the last pulsation in your ear. That’s your diastolic blood pressure. Make sure the cuff is completely deflated. Remove it and record you readings.
When you are using Digital Sphygmomanometer or Monitor:
- Switch on the power button. Ensure the screen displays all symbols including zero.
- Let the bulb be in your right hand. With the cuff already in position, inflate the cuff by compressing and releasing the bulb to inflate it. If your monitor has auto-inflating cuff, then turn the start button on.
- Allow the cuff to inflate and deflate whiles you sit down quietly and watch the screen of the monitor. When the reading is complete, it will display automatically on the screen. The style of the display value may differ from one monitor to the other.
- Finally, note the reading. Usually the systolic pressure is the big number at the top and the diastolic pressure is the small number at the bottom. Remove the deflated cuff and record your reading. However, if you feel the reading is not correct, you can recheck your blood pressure. But you would have to wait for few minutes before doing a recheck.
If you detect any abnormality in your blood pressure, consult your physician.


